External UZH Network Access (VPN)
What is VPN? UZH members who are outside the UZH buildings or in their home office have secure access to the UZH network via the "UZH Virtual Private Network" (VPN). This allows you to access systems that are only accessible within the UZH network. VPN also encrypts public connections. More...
Important: Authentication is not equal to encryption. On public networks you authenticate with a password, however, data traffic, that is not additionally encrypted, can be read by the operators of the networks or other persons in the same network.
You will find the relevant instructions under the following drop-down menus.
VPN on private MAC/Windows devices
Note:
Please note that you must have admin rights on the device in order to fully install and configure the VPN client.
If you have difficulties accessing e-resources (databases, journals), you can alternatively use the browser-based solution EZproxy (instructions (german) (PDF, 1 MB)).
If you are using a mobile device, please consult the instructions under the section VPN on mobile devices (iOS/iPadOS & Android).
Information on recurring questions and problems can be found on our FAQ page.
Installation via the UZH Sharepoint page:
Go to https://t.uzh.ch/1Bg and log in with your personal UZH login data.
Open the folder with the latest version and then that of your operating system (for Windows "Windows 64-bit" / for Mac "Mac OS").
Download the two files.
After downloading, first execute the "PulseSecureAppLauncher..." file and then the "PulseSecure..." file.
Allow/confirm each time during installation.
→ Once the installation is complete, the Ivanti Secure Access Client can be opened on the computer.
Click the + in the VPN client menu and enter the following information:
| Type: | 'Policy Secure (UAC) or Connect Secure (VPN)' |
| Name: | UZH VPN |
| Server: | https://remoteaccess.uzh.ch/vpn |
→ Click "Connect" and log in with your personal UZH login data, then the connection should be established.
Notes regarding macOS:
If you are asked to select a certificate during the installation/connection setup, you must select the "Kerberos" certificate.
During the installation, you will automatically be prompted to confirm that Ivanti is allowed to make changes to the computer and/or establish a connection. Simply follow the instructions provided. → Afterwards, depending on what you did not allow and your Mac version, you can grant permission in the system settings under either 'Privacy & Security' or 'General' > 'Login Items' ( > 'Network Extensions' or the 'Background Items' section). Ivanti should already appear there as an option.
If you receive an error message of the type "Please enter a valid ICS URL" -> Please note the FAQ entry #02.
If it is not possible to establish a connection after installing the two downloaded files, it may be necessary to restart the device.
Disconnect:
macOS - via the icon in the menu bar (right-click > UZH VPN > Disconnect)
Windows - Call up the client via the icon in the taskbar and click on "Disconnect".
Re-establish the connection:
Open the Ivanti Secure Client and connect to UZH VPN.
Using VPN on Managed Devices supplied by Central IT
Note:Managed (ger.: verwaltete) devices are computers provided by Central IT (ZI) on which security settings, basic software, updates and licenses are automatically installed and kept up to date by Central IT. Additional software can be installed via the software management application Softwarecenter .
For managed computers (Mac and Windows), the VPN software 'Ivanti Secure Access Client' ('Pulse Secure') is installed automatically. After launching the application, please select 'UZH VPN' and 'Connect'.
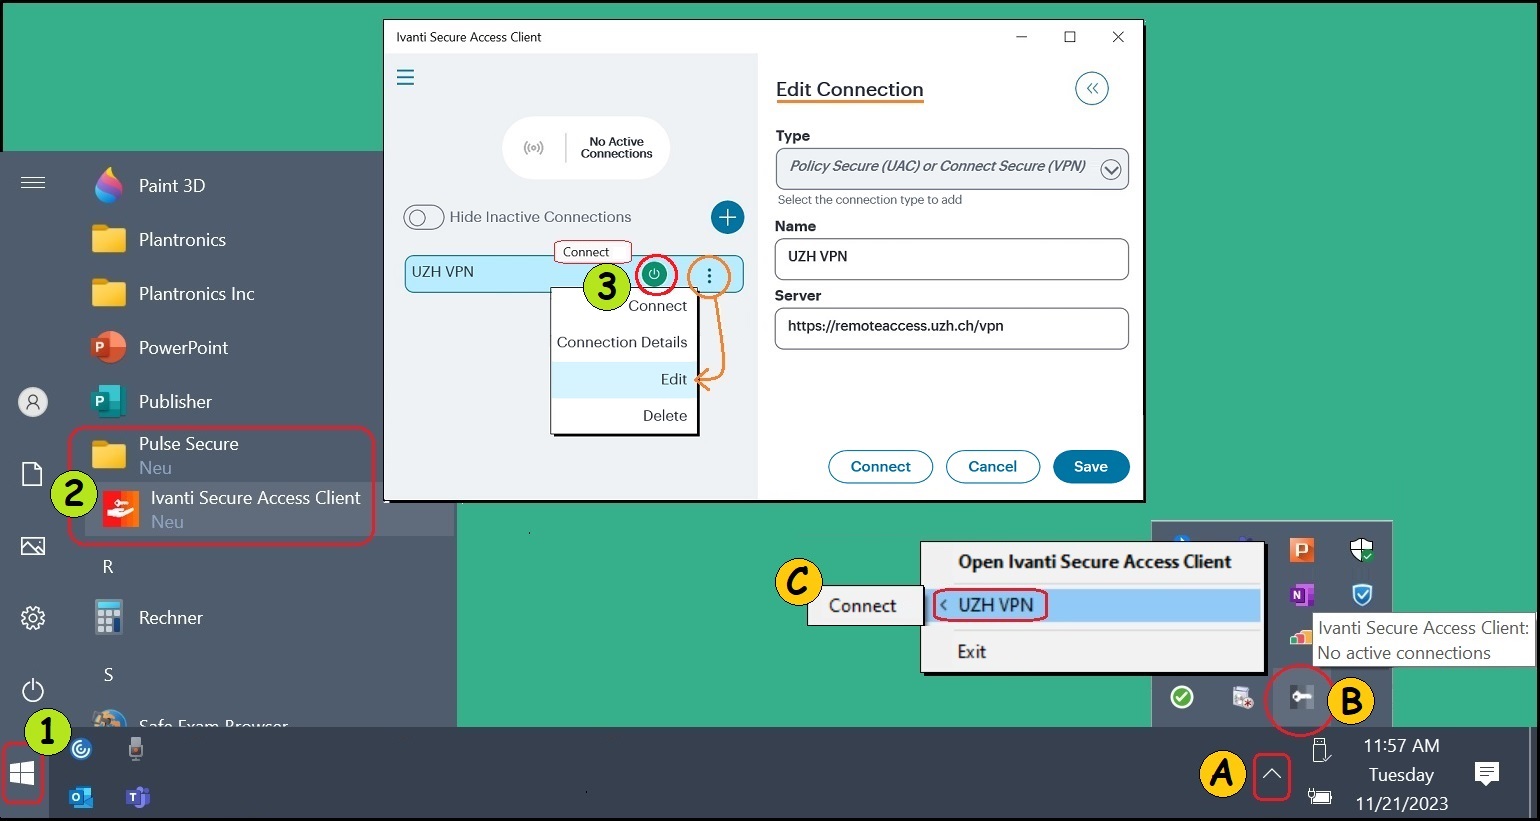
After starting the program (e.g. via the Windows start menu (Fig. 1, step 1)), please select the connection 'UZH VPN' and click 'Connect', for example ...
- within the VPN client, by clicking the green round button (Fig. 1, step 3), or...
- via the Windows taskbar and the client context menu commands (right mouse button, Fig. 1, step C). (The MacOS equivalent to the Windows taskbar is the menu bar, see Fig. 5.)
- Zoom (JPG, 181 KB)
- Fig. 1: VPN client (openend and running on Windows)
(to zoom in, please click on magnifying glass icon)
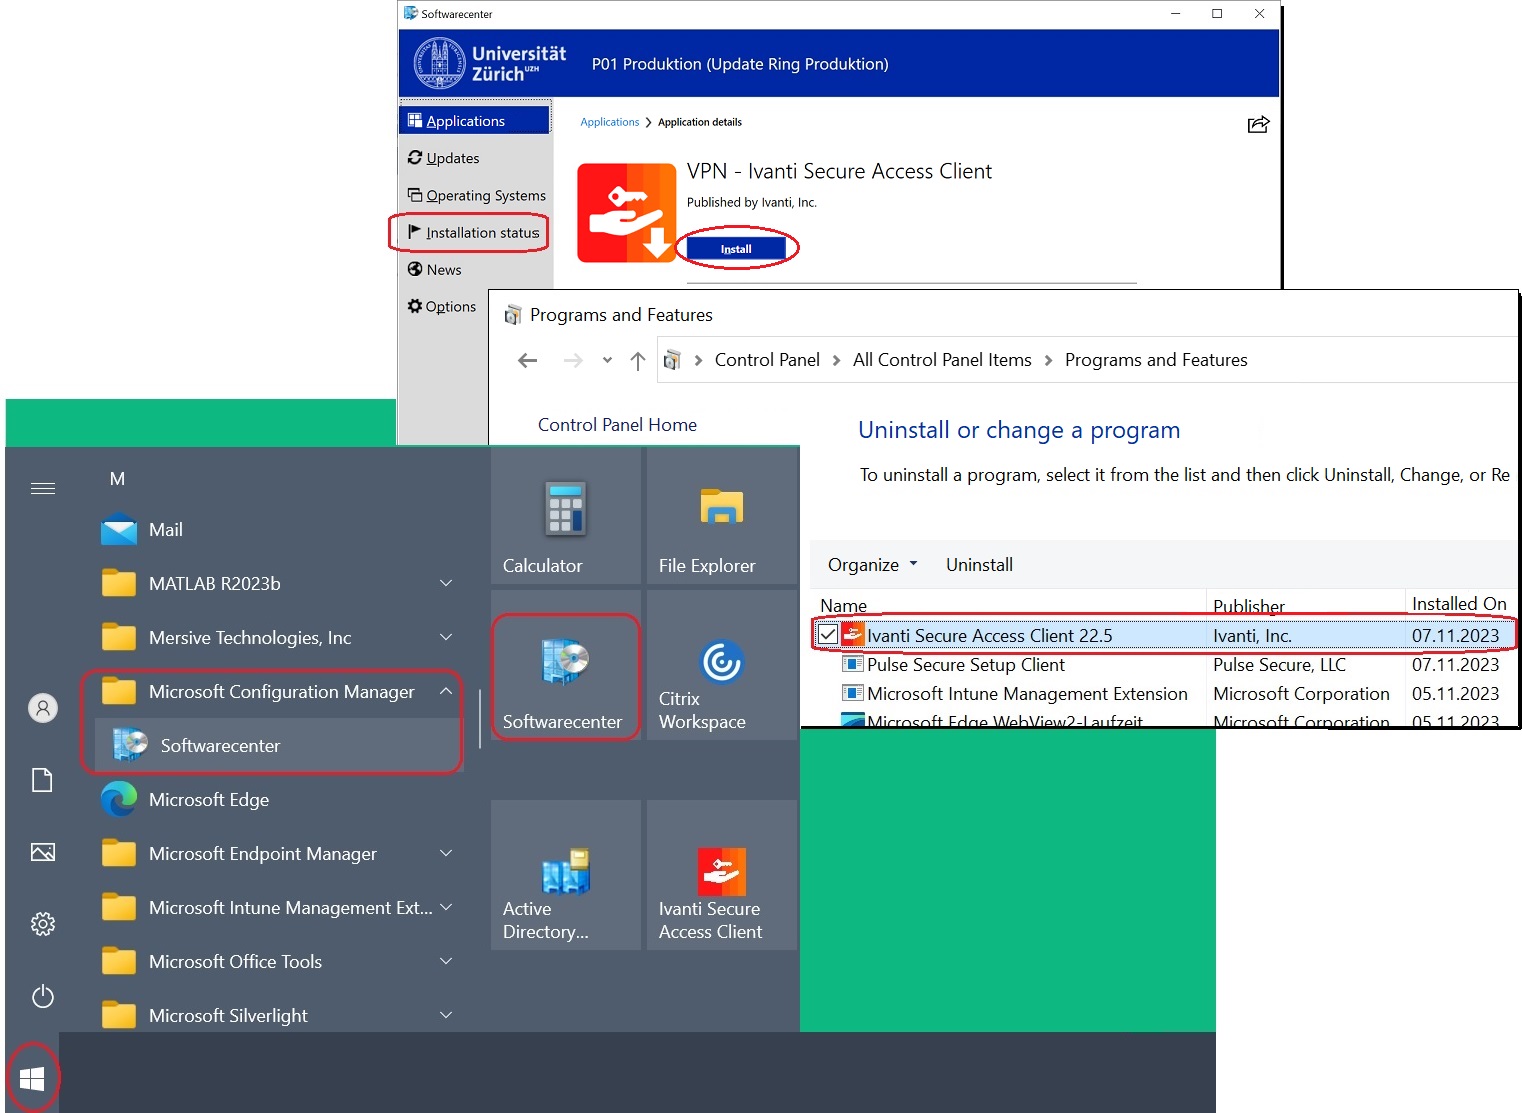
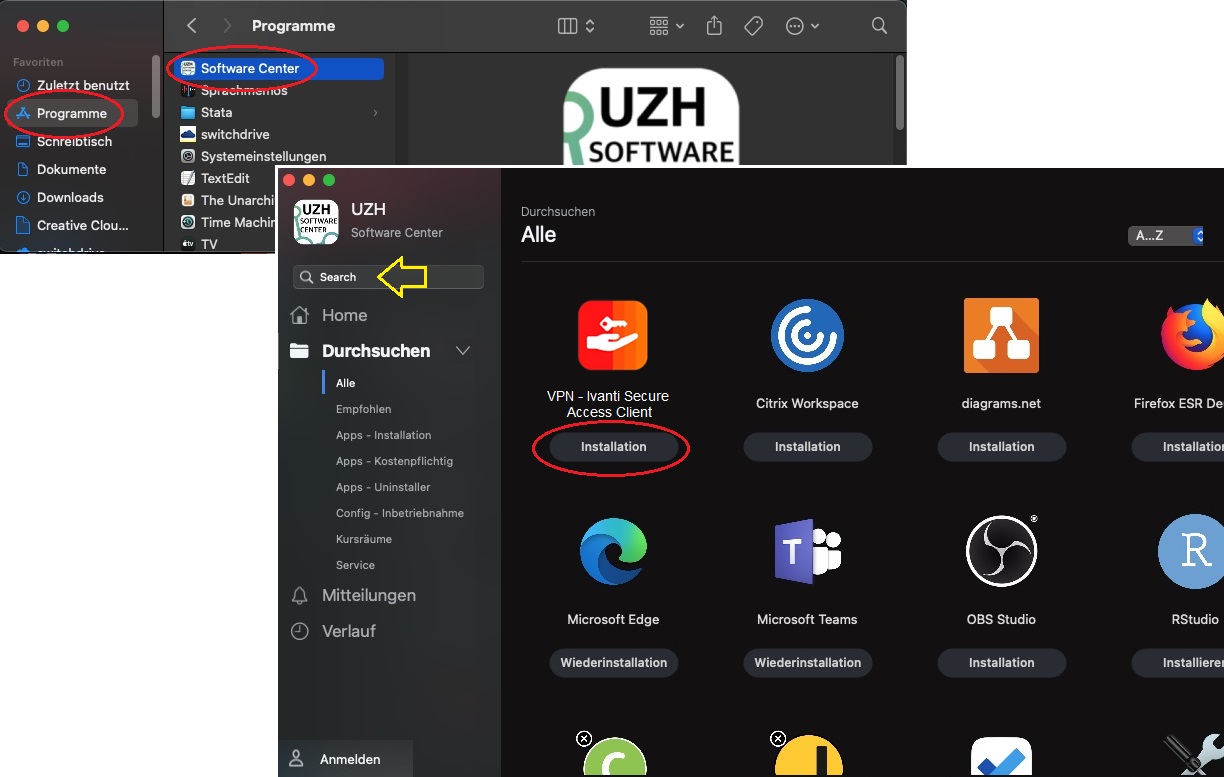
Note: During the pilot phase, the 'VPN - Ivanti Secure Access Client' ('Pulse Secure') app can be installed manually via the Software Center.
- Zoom (JPG, 260 KB)
- Fig. 2: Software Center and installation status on Windows.
(to zoom in, please click on magnifying glass icon)
- Zoom
- Fig. 3: Software Center on MacOS. Enter 'Ivanti' as search term (yellow arrow).
(to zoom in, please click on magnifying glass icon)
Special Case: Linux
Unfortunately, Central IT cannot offer support for Linux computers. For this reason, please find below a model guide for Ubuntu.
- Install the 'PulseUI Client' from this SharePoint site: (VPN Clients (Ivanti (Pulse Secure))).
- Install the necessary libraries:
- Ubuntu and Debian: sudo apt-get install libnss3-tools - Execute the installation with the following commands:
Once the downloaded files are saved to the directory /$HOME/Downloads, ...
- For Ubuntu: sudo dpkg -i /$HOME/downloads/
- For Debian-based Linux versions (similar to Ubuntu): sudo dpkg -i
- For RPM-based Linux versions (such as CentOS): sudo rpm -ivh - A shortcut to the VPN client is created in the start menu under 'Accessories -> PulseUI' . This points to the file /opt/pulsesecure/bin/pulseUI .
- pulseUI requires Chromium Embedded Browser (CEF) and will try to install it if necessary. If the installation fails, you can do it manually with ...
'sudo /opt/pulsesecure/bin/setup_cef.sh install' .
See also How to setup and use Ivanti Secure Access Client (Linux)? and FAQ.
Please note:
- Creating a manual connection:
- Connection type: 'Policy Secure (UAC) or Connect Secure (VPN)'
- URL: https://remoteaccess.uzh.ch/vpn - Eventually you must
- first install the cef-framework with root rights (see our FAQ).
- Furthermore, only install the client with systemd as Init Manager.
- Activate systemd-resolved and configure in stub mode.
VPN on Mobile Devices (iOS/iPadOS & Android)
On iPhones and iPads (or on devices that use iOS or iPadOS), access to e-resources licensed by UZH (e-journals, databases) via Ivanti VPN does NOT work for students. As an alternative, please use the browser-based access via EZ-Proxy (see FAQ #04).
1.) Download VPN client from Store, install and launch
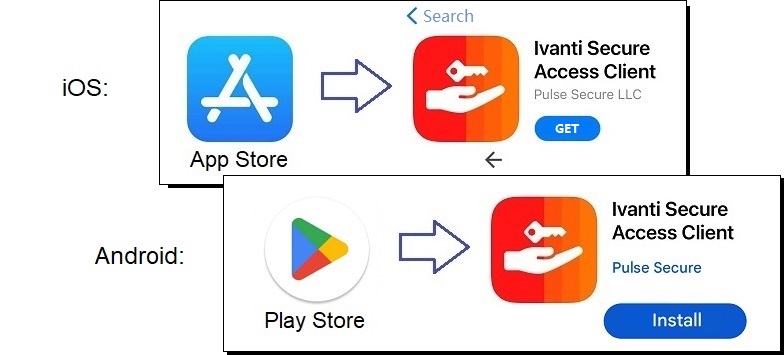
- On your device, open the 'App Store' (iOS) or 'Play Store' (Android) app.
- In the app, search for 'Ivanti Secure Access Client' ('Pulse Secure').
- Select Get or Install or open the corresponding app.
- iOS: If necessary, authorize the installation with your Apple ID.
- If you have already installed the app, all you have to do is open it.
2.) Add VPN connection
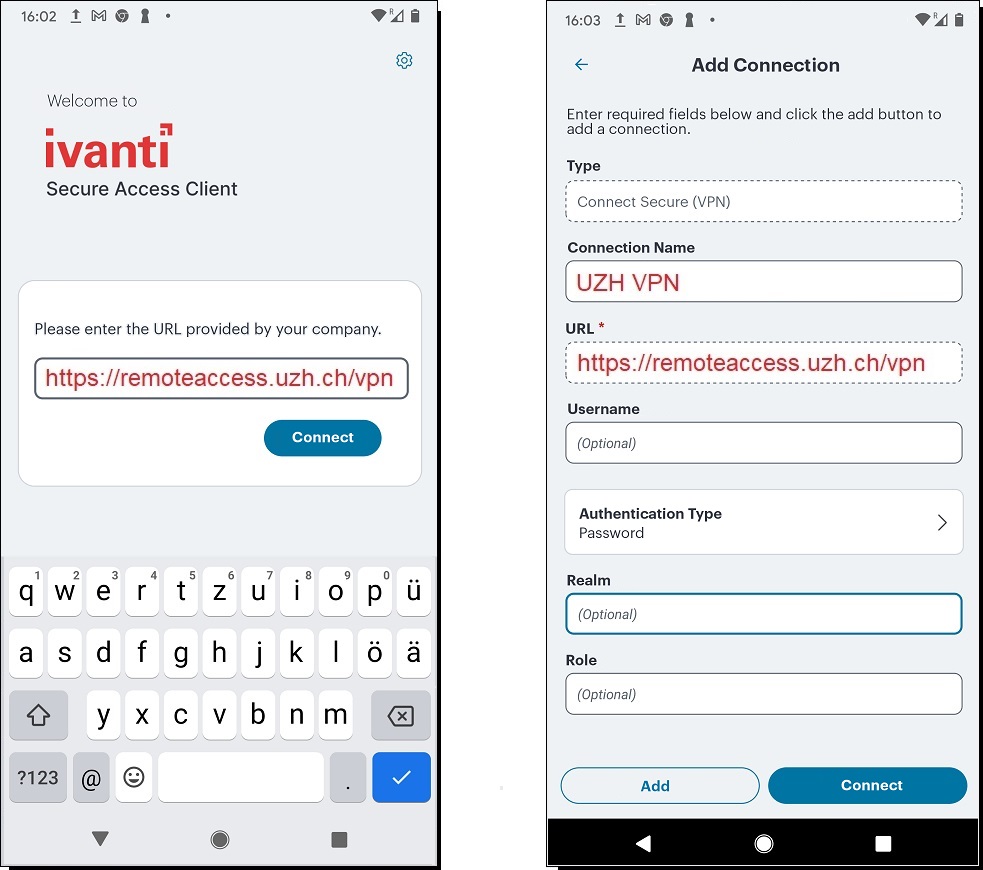
- Enter the URL of the VPN server: https://remoteaccess.uzh.ch/vpn
- Tap the 'Connect' button. - Enter a connection name: e.g. UZH VPN.
- Tap the 'Connect' button. - Connection type: 'Policy Secure (UAC)' or 'Connect Secure (VPN)'.
- Allow 'Secure Access' to filter or monitor network activities.
- iOS: enter your device PIN.
- Android: The permission request only appears after step 3 (MFA).
- Zoom (JPG, 156 KB)
- Fig.: Enter server URL and connection name.
(to zoom in, please click on magnifying glass icon)
3.) Multifactor Authentication
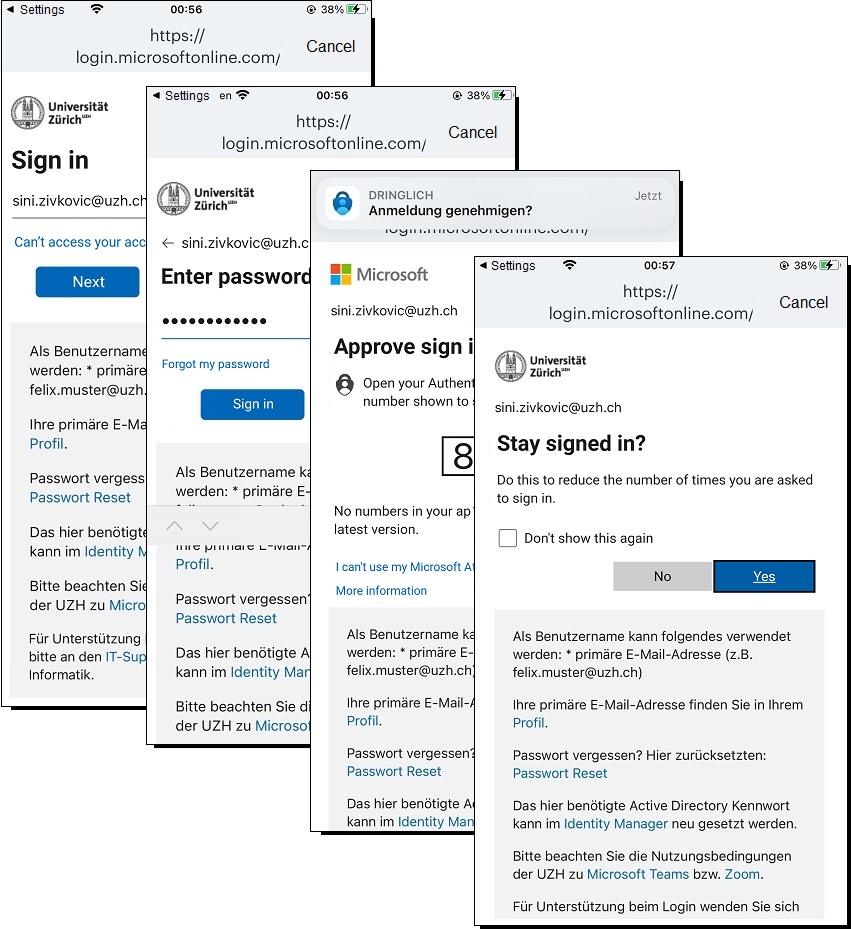
- Enter email address and password
- Confirm authentication request and select "stay logged in"
4.) Establish VPN connection
- Zoom
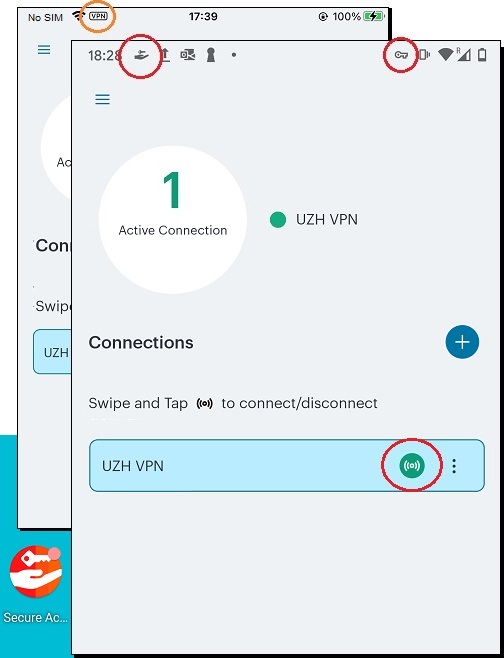
- Abb.: Connection overview on iOS (back) and Android (front).
(to zoom in, please click on magnifying glass icon)
- An active connection is established automatically. Tap on the round gray/green button to establish / disconnect the connection manually if necessary.
- Below the three vertical ellipses, to the right of the round connection button, you can change an existing connection via the context menu command 'Edit'.
- You can add additional connections via the round blue button with the plus symbol directly above the connection button.
- When the connection is active, the [VPN] symbol appears in the top status bar on iOS. On Android, you will see a system key symbol and the Ivanti hand symbol appear on Android.
- Bei aktiver Verbindung erscheint in der oberen Statusleiste bei iOS das Symbol [VPN], auf Android das systemseitige Schlüsselsymbol und das Ivanti Handsymbol. Desweiteren, auf Android und beim App-Desktopsymbol, ein kleiner rosaroter Kreis (see fig.).
General Information
- Pulse Secure was acquired by 'Ivanti' on December 1, 2020.
Requirements for using the UZH VPN:
- An active account in the UZH Identity Management (ISIM).
- A Microsoft M365 license.
Settings:
- Connections are automatically terminated after 12 hours or one hour of inactivity.
- After 12 hours, each device requires a new MFA login.
- For each user, up to three devices can establish a VPN connection at the same time.
- If you want to log in to the portal in the web browser with https://remoteaccess.uzh.ch/vpn, you may be notified of open connections. You then have the option of closing such open sessions. Important: Open connections do not have to be closed. It is helpful to have an overview of open connections and to close them if necessary.
- Different profiles are automatically assigned to employees and students; if you do not have the required authorizations, please contact your IT manager (NAC concept).
Hint:
- VPN connections can be interrupted / paused and then resumed WITHOUT a new login, allowing access to network resources outside UZH (e.g. printers in the home office).
Updates:
- For managed laptops, the application is updated automatically by the Central IT (ZI) software distribution.
- If you receive a prompt to update the client when you log in to Ivanti on your BYOD device (bring your own device), please follow this prompt.
- The update for mobile devices (iOS, Android) is carried out via the manufacturer's app store.
System requirements:
Ivanti Secure Access Client Supported Platforms Guide (pdf-Datei)
Ivanti Secure Access Client Hardware Requirements
Platform and Browser Compatibility
Further information:Connect to Ivanti Pulse Secure from Arch Linux (external private page, no responsibility is taken for the correctness of this information)
